


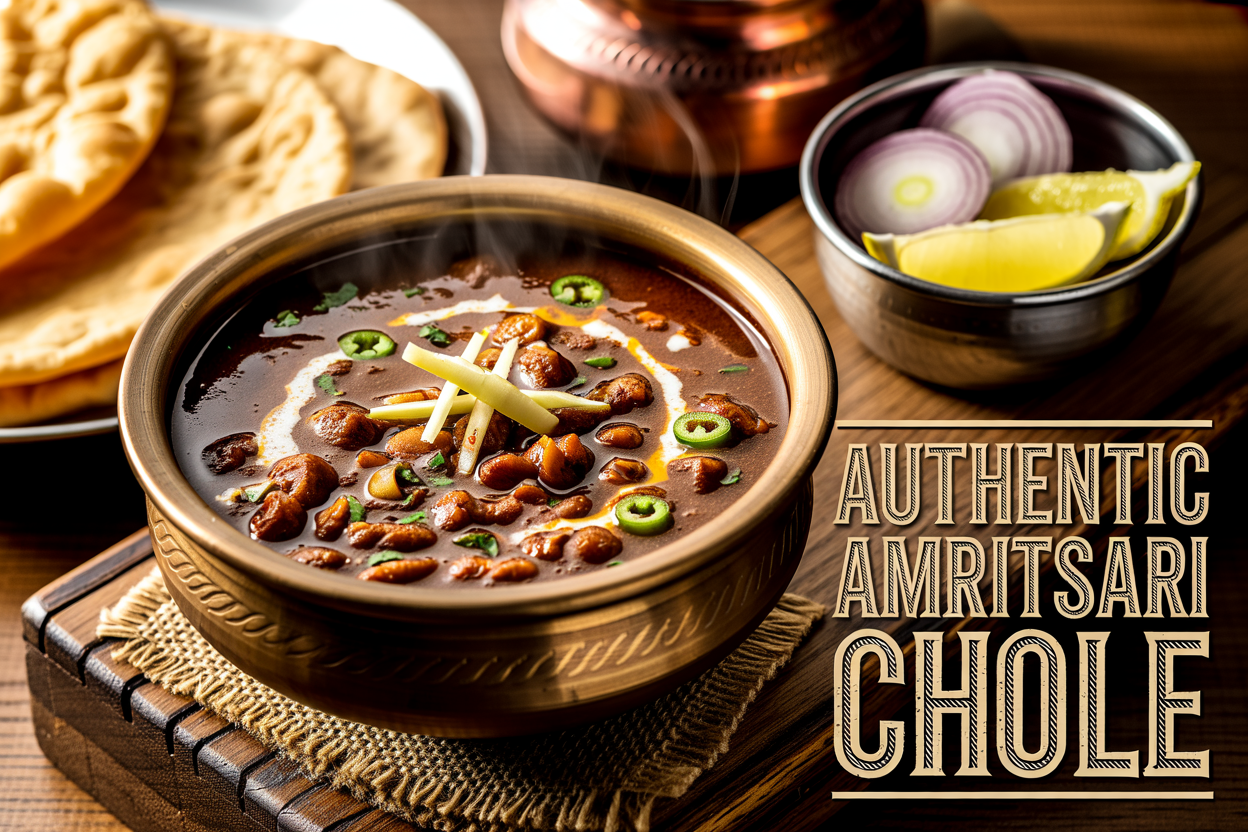
The Ultimate Guide to Making Amritsari Chole at Home
If you’ve ever had a plate of Amritsari Chole recipe at a roadside dhaba in Punjab and thought “I need to make this at home,” this guide is for you. Home cooks who love bold, deeply spiced food but keep ending up with a bland chickpea curry — this one’s written for you.
Amritsari Chole isn’t just another chickpea curry. That dark, rich gravy and the punch of whole spices is what sets this authentic Punjabi chole apart from every other version you’ve tried. Getting it right at home comes down to three things — knowing your ingredients, nailing the Amritsari chole spice blend, and following a cooking process that actually works in a regular kitchen.
Here’s what we’ll cover:
- What makes this dish unique — and why most homemade versions fall short
- The exact chole masala ingredients you need, including a few you might be skipping
- Step-by-step cooking tips so you get consistent, restaurant-quality results every single time
By the end of this, you’ll have everything you need to pull off a traditional Punjabi chickpea curry that tastes like it came straight from Amritsar — right from your own kitchen.
Table of Contents
Understanding What Makes Amritsari Chole Unique
The Rich History Behind This Iconic Punjabi Dish
Amritsari Chole carries centuries of history in every bite. This dish has its roots deep in the heart of Amritsar, a city in Punjab that has long been considered the cultural and spiritual capital of the Sikh community. The Golden Temple, or Harmandir Sahib, sits at the center of this city — and so does the food culture that surrounds it.
The langar (community kitchen) at the Golden Temple has been serving free meals to thousands of pilgrims daily for hundreds of years. Chole has always been a staple part of this sacred meal tradition, cooked in massive quantities using wood-fired chulhas (clay stoves). That slow-cooking method over open flame is one of the earliest reasons why Amritsari Chole developed such a depth of flavor that simply cannot be replicated in a regular pot on a gas burner without some clever tricks.
The streets of Amritsar have their own food culture built around this dish. Vendors in the narrow lanes of Hall Bazaar and near the Golden Temple complex have been serving chole bhature and chole kulche for generations. Families pass down recipes with slight variations, but the soul of the dish stays the same — bold, smoky, deeply spiced, and unapologetically hearty.
The dish also reflects the Punjabi spirit as a whole. Punjab has historically been an agricultural land, and its food has always been generous in portion and intense in flavor. Nothing about Amritsari Chole is subtle, and that is exactly the point.
Key Flavor Differences from Regular Chana Masala
People often use the terms “Amritsari Chole” and “Chana Masala” interchangeably, but anyone who has eaten the real deal will tell you these two dishes taste quite different. Here is a breakdown of what sets them apart:
| Feature | Amritsari Chole | Regular Chana Masala |
|---|---|---|
| Color | Deep brown to almost black | Golden yellow to orange-red |
| Flavor Profile | Smoky, tangy, intensely spiced | Mildly spiced, slightly sweet-tangy |
| Cooking Liquid | Tea or amla (dried gooseberry) used while boiling | Plain water mostly |
| Spice Depth | Layered with whole and ground spices, slow-cooked | Quicker cook time, lighter masala |
| Texture of Gravy | Thick, dark, clingy | Can range from watery to medium thick |
| Dominant Taste | Sourness from anardana + heat from black cardamom | Tomato-based tanginess |
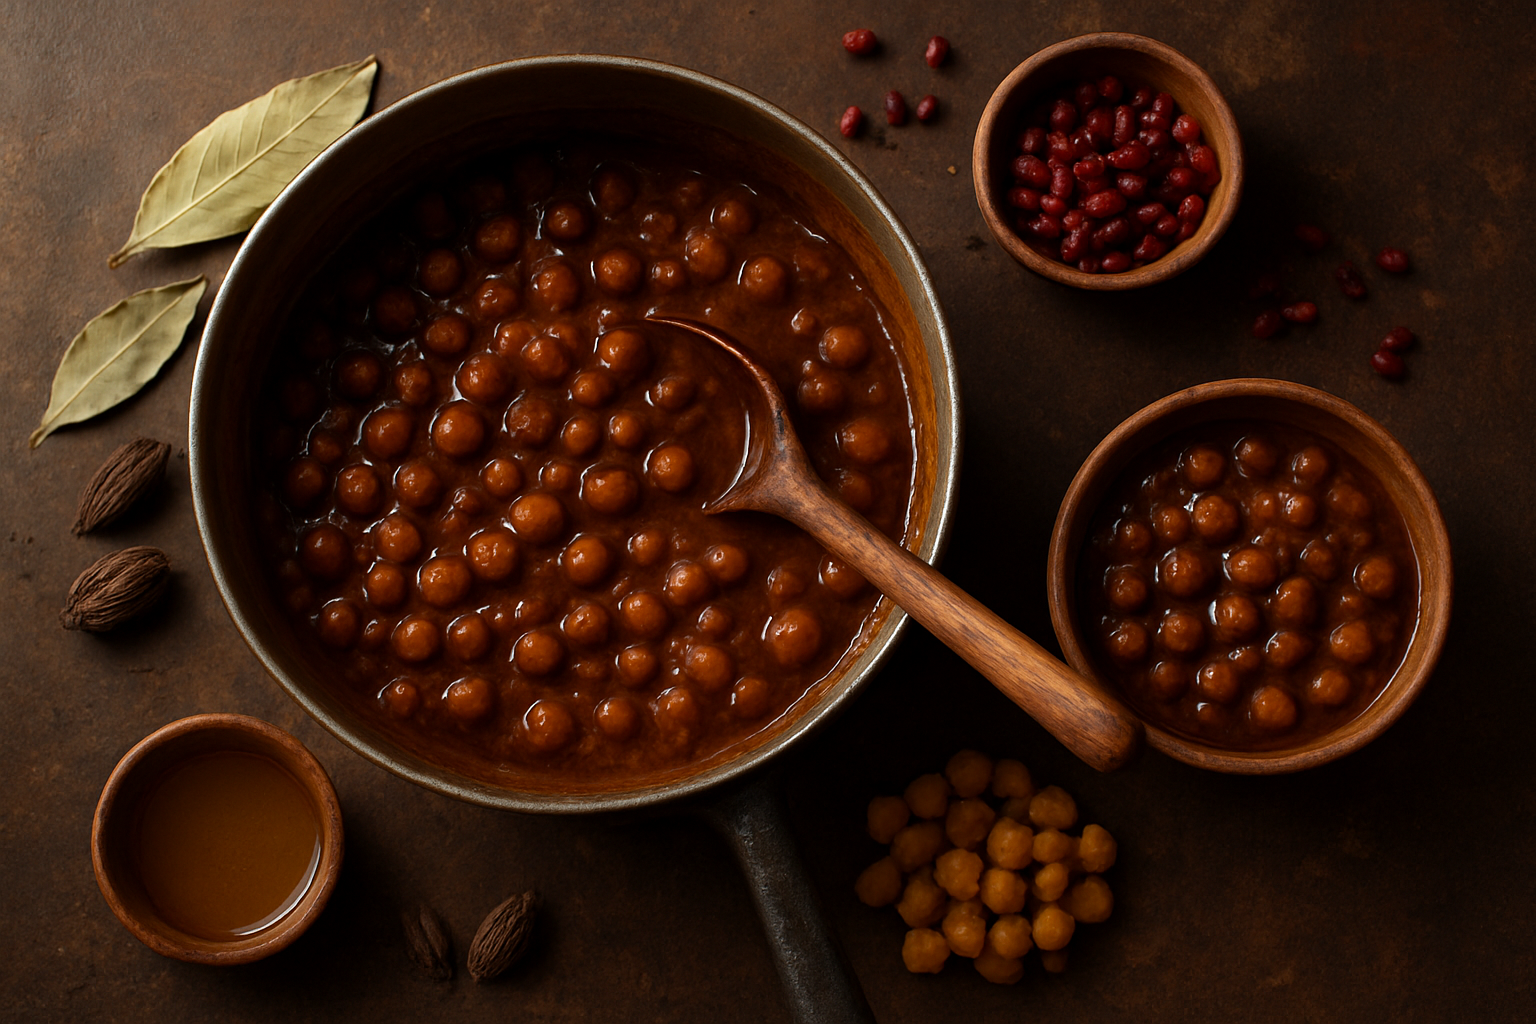
The biggest flavor difference comes from the spice blend. A traditional Amritsari chole spice blend includes dried pomegranate seeds (anardana), black cardamom, bay leaves, and a generous amount of dried mango powder (amchur). These ingredients give the dish a sour punch that is bold and layered, not sharp and one-dimensional the way some vinegar-based versions can taste.
Regular chana masala recipes tend to lean on tomatoes and store-bought chana masala powder as the primary flavor base. That works fine for a quick weeknight dinner, but it will never quite hit the same notes as an authentic Punjabi chole recipe that has been built from scratch using whole spices toasted in a dry pan.
The fat used also plays a role. Authentic Amritsari chole traditionally uses mustard oil or pure desi ghee. This adds a distinctive pungency and richness that vegetable oil simply cannot replicate. If you have ever wondered why restaurant versions taste different from your homemade attempts, the oil is often part of the answer.
Why the Dark Color and Bold Taste Set It Apart
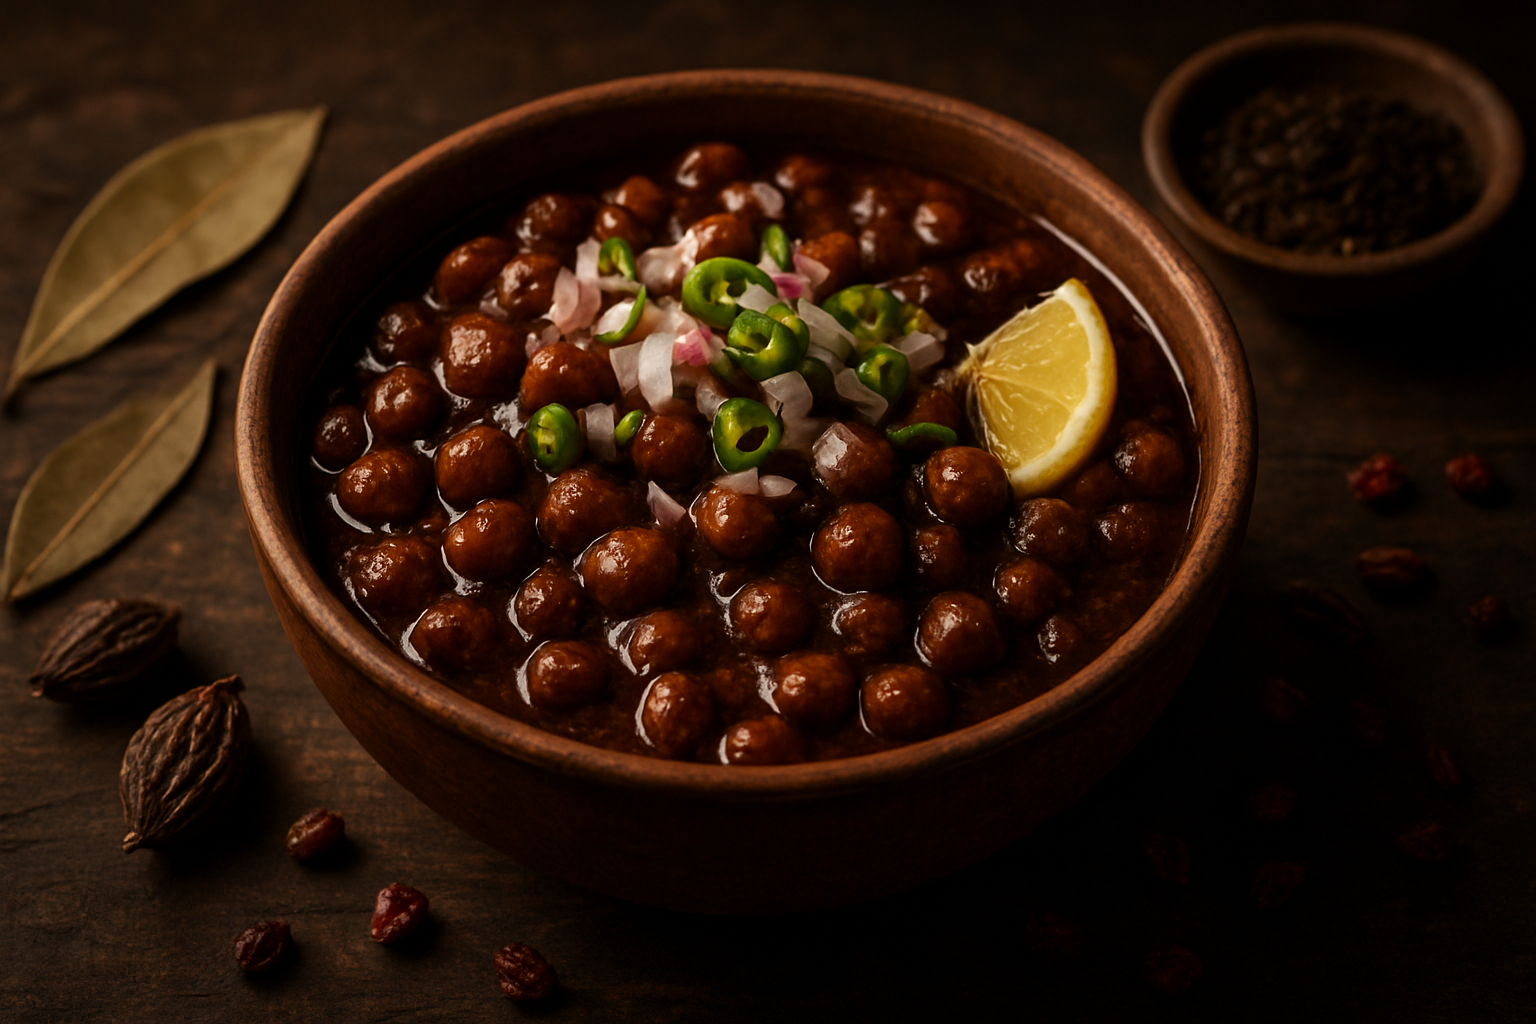
The first thing you notice when a plate of Amritsari Chole arrives at the table is the color. It is dark — sometimes so dark it looks almost black-brown rather than the familiar reddish-orange you might expect from a chickpea curry. That color is not an accident, and it is not from food coloring either.
Here is what creates that signature dark color:
- Tea bags or black tea liquor — The dried chickpeas are soaked and then boiled with black tea bags. The tannins from the tea seep into the chickpeas, turning them a deep, earthy brown from the inside out. This is the most important step in achieving that authentic color.
- Dried amla (Indian gooseberry) — Some traditional recipes include dried amla pieces while boiling the chickpeas alongside the tea bags. Amla deepens the color and adds a subtle tartness.
- Dark whole spices — Black cardamom, cloves, and black peppercorns add to the visual depth when they work their way through the gravy during slow cooking.
- Long cooking time — The extended simmering process allows the masala to caramelize slightly and develop a darker, richer tone compared to quickly cooked versions.
Beyond the color, the bold taste of a proper traditional Punjabi chickpea curry like Amritsari Chole comes from a technique called “bhunoing” — a specific way of cooking the masala paste (onions, tomatoes, ginger, garlic) on high heat while stirring constantly until the oil separates completely. This process takes patience, but it is what builds that unmistakable depth of flavor that makes people go back for seconds.
The sourness is another defining characteristic. Unlike other chickpea curries that get their tang from tomatoes alone, Amritsari Chole layers its sourness from multiple sources — anardana, amchur, and sometimes even tamarind paste in small amounts. Each source of tanginess adds a slightly different quality, which is why the dish feels complex on the palate rather than flat or one-note.
The heat level is also deliberately higher than standard chana masala. Both green chilies cooked into the gravy and a finishing sprinkle of red chili powder on top are common. That hit of heat ties everything together and gives the dish that bold, punchy character that the city of Amritsar itself is known for.
Essential Ingredients for Authentic Amritsari Chole

Choosing the Right Chickpeas for the Best Texture
The chickpeas you pick will make or break your Amritsari chole recipe. This dish is not the place for shortcuts or random pantry grabs.
Dried Kabuli Chana (white chickpeas) are the gold standard here. Skip the canned ones if you can — they tend to go mushy and lack the firm, slightly grainy bite that makes authentic Punjabi chole so satisfying. Dried chickpeas, soaked overnight and pressure-cooked, hold their shape beautifully while still absorbing all that spiced cooking liquid.
Here’s a quick comparison to help you decide:
| Chickpea Type | Texture | Flavor Absorption | Recommended? |
|---|---|---|---|
| Dried Kabuli Chana (soaked overnight) | Firm, creamy inside | Excellent | ✅ Best choice |
| Canned Chickpeas | Soft, can go mushy | Moderate | ⚠️ Use only in a pinch |
| Quick-soaked dried (2 hours) | Decent but uneven | Good | ✅ Acceptable |
| Split chickpeas (chana dal) | Crumbly | Poor | ❌ Wrong dish |
Soak your dried chickpeas in plenty of cold water for at least 8 hours, ideally overnight. They will nearly double in size, so use a large bowl. After soaking, drain and rinse them well before cooking. This step removes the compounds that cause bloating and helps you get that creamy-yet-firm texture that is the hallmark of a great traditional Punjabi chickpea curry.
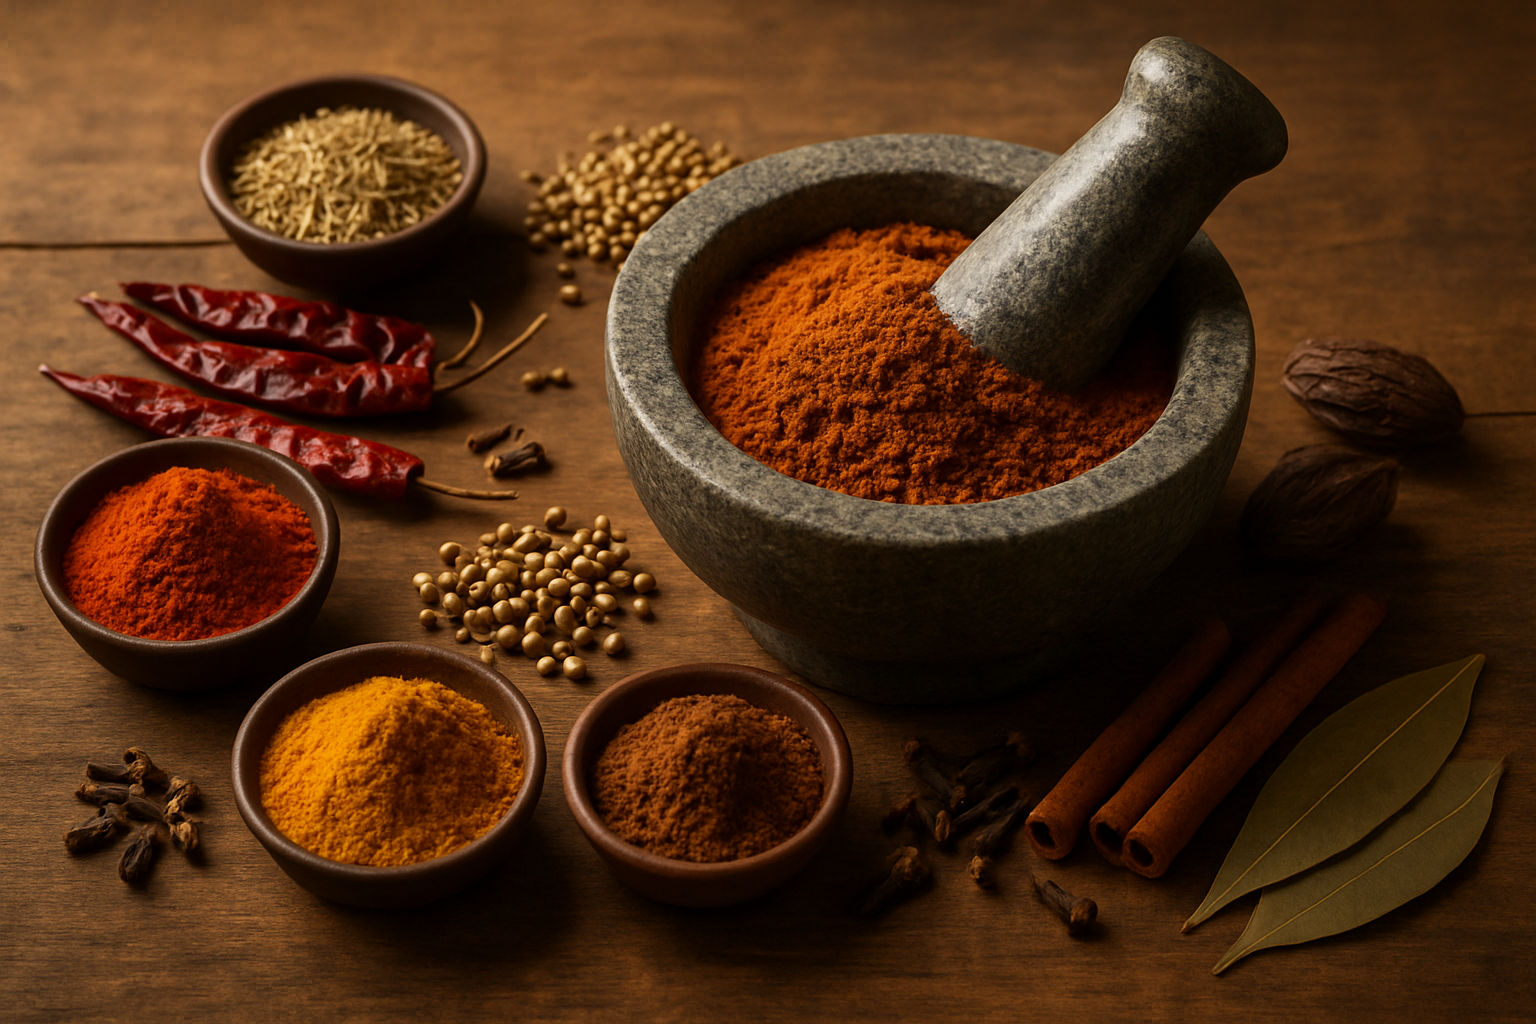
Must-Have Whole Spices That Build Deep Flavor
The soul of any homemade chole masala lies in the whole spices added at the very beginning of cooking. These are not decorative — they infuse the chickpeas from the inside out during the pressure cooking stage, creating layers of flavor you simply cannot replicate by dumping ground spices at the end.
Whole spices to always include:
- Bay leaves (tej patta) — 2 to 3 leaves; they add a subtle earthy depth
- Black cardamom (badi elaichi) — 1 to 2 pods; smoky, camphor-like aroma that is distinctly Punjabi
- Green cardamom (choti elaichi) — 2 pods; adds a gentle floral sweetness
- Cloves (laung) — 3 to 4; sharp and warming
- Black peppercorns — 6 to 8; gentle heat that builds slowly
- Cinnamon stick (dalchini) — 1 small piece; sweet warmth without overpowering
- Dried red chilies — 1 to 2; for a background heat
The black cardamom is the single most important spice in this list and the one that sets Amritsari chole apart from any generic chickpea curry Indian style. Its smoky flavor is non-negotiable. If your local grocery does not carry it, an Indian grocery store or online spice shop will definitely have it.
Add all of these directly into the pressure cooker along with the soaked chickpeas and water. Let them do their job quietly. You will fish out the bigger ones before serving, but their work will already be done.
The Role of Tea Bags or Amla in Achieving the Dark Color
One look at a plate of authentic Amritsari chole and you will notice the gravy is deep brown, almost black — a far cry from the pale yellow you get from most basic chickpea curries. That color is not from food coloring or excessive chili powder. It comes from one of two traditional tricks: black tea bags or dried amla (Indian gooseberry).
Black Tea Bags:
Tuck 2 to 3 black tea bags (plain, unflavored) into your pressure cooker with the chickpeas and water. The tannins in the tea stain the chickpeas a gorgeous dark hue and also add a very subtle astringency that balances the richness of the masala. Remove the bags before serving.
Dried Amla:
This is the more traditional Amritsari method. Dried amla pieces (2 to 3 small ones) go in with the chickpeas during the pressure cooking phase. Amla is naturally high in tannins and gives a slightly tangier, deeper color compared to tea bags. It also adds a very faint sourness which blends seamlessly into the overall flavor profile.
Which one should you use?
| Method | Color Result | Flavor Impact | Availability |
|---|---|---|---|
| Black tea bags | Deep brown | Mild astringency | Very easy to find |
| Dried amla | Dark brown with reddish tones | Subtle tang | Indian grocery stores |
| Neither | Pale yellow-beige | No additional flavor | Not recommended |
Either option works beautifully. If you are making this best chole bhature recipe for guests and want that authentic street-food look, do not skip this step. It is what makes people stop and stare at the dish before they even take a bite.
Fresh Aromatics That Elevate the Dish
Once your chickpeas are pressure-cooked to perfection, the fresh aromatics you use to build the gravy are what bring everything together. These are the ingredients that fill your kitchen with the kind of aroma that makes everyone suddenly appear and ask when dinner is ready.
Onions:
Use yellow or red onions, finely chopped. Cook them low and slow in oil or ghee until they turn a deep golden brown — not just translucent, not just light gold, but deeply caramelized. This takes patience (about 15 to 20 minutes) and is the most important step in building a rich, thick gravy. Rushing this step is one of the most common mistakes people make when trying to cook easy chole at home.
Ginger and Garlic:
Fresh always wins here. Use a roughly equal ratio — about 1 tablespoon of each per cup of dried chickpeas. Grate or pound them into a paste rather than chopping, so they melt into the masala instead of leaving sharp bits behind. The combination creates that warm, pungent backbone the dish depends on.
Tomatoes:
Fresh, ripe tomatoes cooked down until they lose all their raw smell are non-negotiable. They add body, acidity, and a natural sweetness. Some traditional recipes in Amritsar use pureed tomatoes for a smoother gravy, while others prefer rough-chopped. Both work well depending on the texture you are going for.
Green Chilies:
Slit whole green chilies (serrano or the thin Indian variety) stirred in toward the end give a fresh, grassy heat that is different from the slow burn of dry red chili powder. Start with 2 and adjust based on how much heat your table can handle.
Fresh Coriander (Cilantro):
Scatter a generous handful of freshly chopped coriander right before serving. It is not just for looks — the fresh herb cuts through the richness of the gravy and gives every bite a little lift.
These aromatics are the backbone of any good chole masala ingredients list. Getting them right means the difference between a dish that tastes homemade in the best way and one that tastes like it came from a jar.
Mastering the Perfect Spice Blend
How to Make Homemade Chole Masala from Scratch
Making your own homemade chole masala is genuinely a game-changer. Yes, it takes a little more effort than reaching for a packet, but the depth of flavor you get is completely different — warmer, more complex, and perfectly tuned to your taste.
Here’s the spice blend that forms the backbone of an authentic Amritsari chole recipe:
Whole Spices to Dry Roast First:
- 2 tablespoons coriander seeds
- 1 tablespoon cumin seeds
- 1 teaspoon black peppercorns
- 4–5 dried red chilies (Kashmiri for color, regular for heat)
- 1 black cardamom pod
- 3–4 green cardamom pods
- 1 small piece of cinnamon
- 4–5 cloves
- 1 teaspoon fennel seeds
- ½ teaspoon caraway seeds (shahi jeera)
- 1 bay leaf
Ground Spices to Add After:
- 2 teaspoons amchur (dry mango powder)
- 1 teaspoon pomegranate seed powder (anardana)
- ½ teaspoon black salt
- 1 teaspoon dried ginger powder (sonth)
The Dry Roasting Process
Dry roast all the whole spices on a low flame in a heavy-bottomed pan. Keep stirring — you want them toasted, not burned. The moment they start releasing a nutty, warm aroma (usually about 2–3 minutes), take the pan off the heat and spread the spices on a plate to cool completely.
Once cool, grind them to a fine powder in a spice grinder or a dedicated coffee grinder. Add the ground spices — amchur, anardana, black salt, and sonth — to the powder and mix well. Store in an airtight jar away from light and moisture. This blend stays potent for up to 6 weeks.
The secret ingredient that makes Amritsari chole taste so distinctly different from other chickpea curries is black cardamom and dried pomegranate seeds. Black cardamom brings a smoky, camphor-like depth that you simply cannot replicate with green cardamom. Anardana adds a fruity, slightly tart note that’s completely unique to this regional recipe.
Balancing Heat, Tanginess, and Earthiness in Every Bite
A truly great Amritsari chole spice blend hits three flavor notes simultaneously — heat, tang, and earthiness — without any single one overpowering the others. This balance is what separates a good chole from an unforgettable one.
Managing Heat
The heat in Amritsari chole comes from two sources:
- Dried red chilies — for slow-building, lingering heat
- Black pepper — for a sharper, more upfront bite
If you want serious heat, increase the dried red chilies and keep the Kashmiri variety in there too (mainly for that gorgeous deep red color). If your crowd is heat-sensitive, swap to mostly Kashmiri chilies but keep a pinch of cayenne so the dish doesn’t taste flat.
Nailing the Tanginess
The tanginess in this traditional Punjabi chickpea curry comes from a combination of:
| Ingredient | Role | Intensity |
|---|---|---|
| Amchur (dry mango powder) | Sharp, citrusy tang | Medium-high |
| Anardana (pomegranate powder) | Fruity, rounded sourness | Medium |
| Tamarind (optional) | Deep, molasses-like tartness | High |
| Tomatoes | Fresh, bright acidity | Low-medium |
Don’t rely on just one souring agent. The combination of amchur and anardana creates a layered tanginess that single-ingredient sourness can’t match. If your chole still feels flat after cooking, a tiny squeeze of lemon at the end (off the heat) works wonders.
Building Earthiness
Earthiness is the foundation that holds all the other flavors together. It comes from:
- Coriander seeds — the biggest contributor; use generously
- Cumin seeds — warm and slightly bitter
- Black cardamom — smoky and resinous
- Dried ginger (sonth) — warmer and more pungent than fresh ginger
A common mistake people make is under-roasting the spices. Light roasting doesn’t crack open the essential oils inside the seeds — you need that deeper golden color and aroma before you grind. Think of it like toasting bread; pale toast and golden-brown toast are completely different experiences.
Also, add your spice blend at the right moment. Stir it into the onion-tomato masala after the tomatoes have cooked down and the oil has started separating. This gives the spices a chance to bloom in the fat, which releases fat-soluble flavor compounds that you’d otherwise miss.
Store-Bought Spice Blends Worth Using as a Shortcut
Sometimes you just don’t have time to grind your own masala — and that’s completely fine. There are some genuinely good store-bought options that can deliver a solid easy chole recipe at home without sacrificing too much on flavor.
Top Picks Worth Keeping in Your Pantry
1. MDH Chana Masala
This is arguably the most trusted name for chole masala in Indian kitchens. MDH’s blend has excellent balance — it’s tangy, aromatic, and not overly salty. It works particularly well if you bump it up with a little extra amchur and a pinch of black cardamom powder.
2. Everest Chole Masala
Everest tends to be slightly spicier than MDH and has a richer red color from Kashmiri chili. It’s a great option if you like your chole on the bolder side.
3. Badshah Chole Masala
Badshah is a reliable mid-range option with a slightly sweeter spice profile. Works well if you prefer a more mellow, family-friendly version.
4. Catch Chole Masala
Lighter and less intense than the others, Catch is a good pick if you’re making chole for people who aren’t used to very heavy spicing.
How to Use Store-Bought Blends the Right Way
Even with a packet blend, there are a few things that make a real difference:
- Dry roast the packet masala briefly in a dry pan before adding it to the curry. This wakes up the spices and removes any raw, dusty taste.
- Add extra whole spices to your cooking oil at the start — a bay leaf, black cardamom, and a small cinnamon stick do a lot of heavy lifting and make any store-bought blend taste more homemade.
- Supplement with amchur — most commercial blends are lighter on tanginess. A half teaspoon of amchur at the end brings the flavor to life.
- Don’t skip the black salt — a small pinch added at the finish gives the chole that signature Punjabi flavor that’s hard to put your finger on but impossible to miss.
| Brand | Heat Level | Tang Level | Best For |
|---|---|---|---|
| MDH Chana Masala | Medium | High | Everyday cooking |
| Everest Chole Masala | Medium-High | Medium-High | Bold, restaurant-style chole |
| Badshah Chole Masala | Medium-Low | Medium | Mild, crowd-pleasing batches |
| Catch Chole Masala | Low | Low-Medium | Beginners or mild palates |
Whether you go the homemade route or reach for a trusted packet, what really matters is understanding what each spice is doing in the dish. Once you know that, you can adjust any blend — store-bought or scratch — to get exactly the flavor you’re after.
Step-by-Step Cooking Process for Foolproof Results
A. Soaking and Boiling Chickpeas to the Ideal Softness
Getting the chickpeas right is the foundation of any great Amritsari Chole recipe. Rush this step and your entire dish pays the price.
Soaking:
- Use dried kabuli chana (white chickpeas) — avoid canned chickpeas if you want authentic results
- Soak in plenty of cold water for at least 8 hours, or overnight for best results
- Add a pinch of baking soda to the soaking water to help break down the outer skin and speed up the softening process
- The chickpeas should roughly double in size after soaking — that’s how you know they’re ready
Boiling with the secret touch:
This is where Amritsari chole gets its signature deep, dark color. Do not skip this step.
- Drain the soaked chickpeas and transfer them to a pressure cooker
- Add fresh water, a whole black cardamom (badi elaichi), two dry bay leaves, a small stick of cinnamon, and — the real game-changer — two to three used tea bags or a tablespoon of loose black tea tied in a muslin cloth
- The tea infuses the chickpeas with that beautiful deep brownish hue that sets authentic Punjabi chole apart from the pale yellow versions
- Pressure cook for 4 to 5 whistles on medium heat until the chickpeas are completely tender but still hold their shape
- When you press a chickpea between your fingers, it should mash easily with zero resistance
- Do not discard the cooking liquid — this starchy, spiced water is liquid gold for your gravy
| Chickpea Texture | Result |
|---|---|
| Slightly firm in the center | Will turn mushy or uneven in gravy — cook longer |
| Mashes easily under finger pressure | Perfect — ready for the next step |
| Falls apart on its own | Overcooked — reduce pressure cook time next batch |
B. Building the Onion-Tomato Base for Maximum Flavor
The masala base is the backbone of this traditional Punjabi chickpea curry. Spend time here and the rest practically takes care of itself.
Getting the onions right:
- Use a generous amount of oil — this is Punjabi cooking, so don’t be shy
- Heat mustard oil or a neutral oil in a heavy-bottomed kadhai or pan over medium-high heat
- Add a pinch of asafoetida (hing) — it blooms in seconds and sets an aromatic foundation
- Add finely chopped onions — the keyword here is finely. Chunky onion pieces will not melt into the gravy properly
- Cook the onions low and slow, stirring occasionally, until they turn deeply golden brown — this takes about 12 to 15 minutes and cannot be rushed
- Golden onions = sweet, caramelized depth; pale onions = raw, sharp flavor that ruins the dish
Adding aromatics:
- Once the onions are golden, push them to the side and add a tablespoon each of ginger paste and garlic paste directly to the oil
- Sauté for 2 to 3 minutes until the raw smell disappears completely
- The mix should smell rich and nutty at this point
Getting the tomatoes right:
- Add pureed fresh tomatoes — about 3 medium-sized ones for every cup of dried chickpeas
- Cook the tomatoes down until all the moisture evaporates and the oil starts separating from the masala
- This is called the “bhuno” stage — you’re essentially frying the tomato paste in the oil, which concentrates all the flavors
- The masala will pull away from the sides of the pan and look glossy — that’s your signal to move on
- At this stage, add your dry spice powders: coriander powder, cumin powder, red chili powder, and your prepared chole masala blend
- Stir everything together and cook for another 2 minutes so the spices fry in the oil rather than just sitting on top
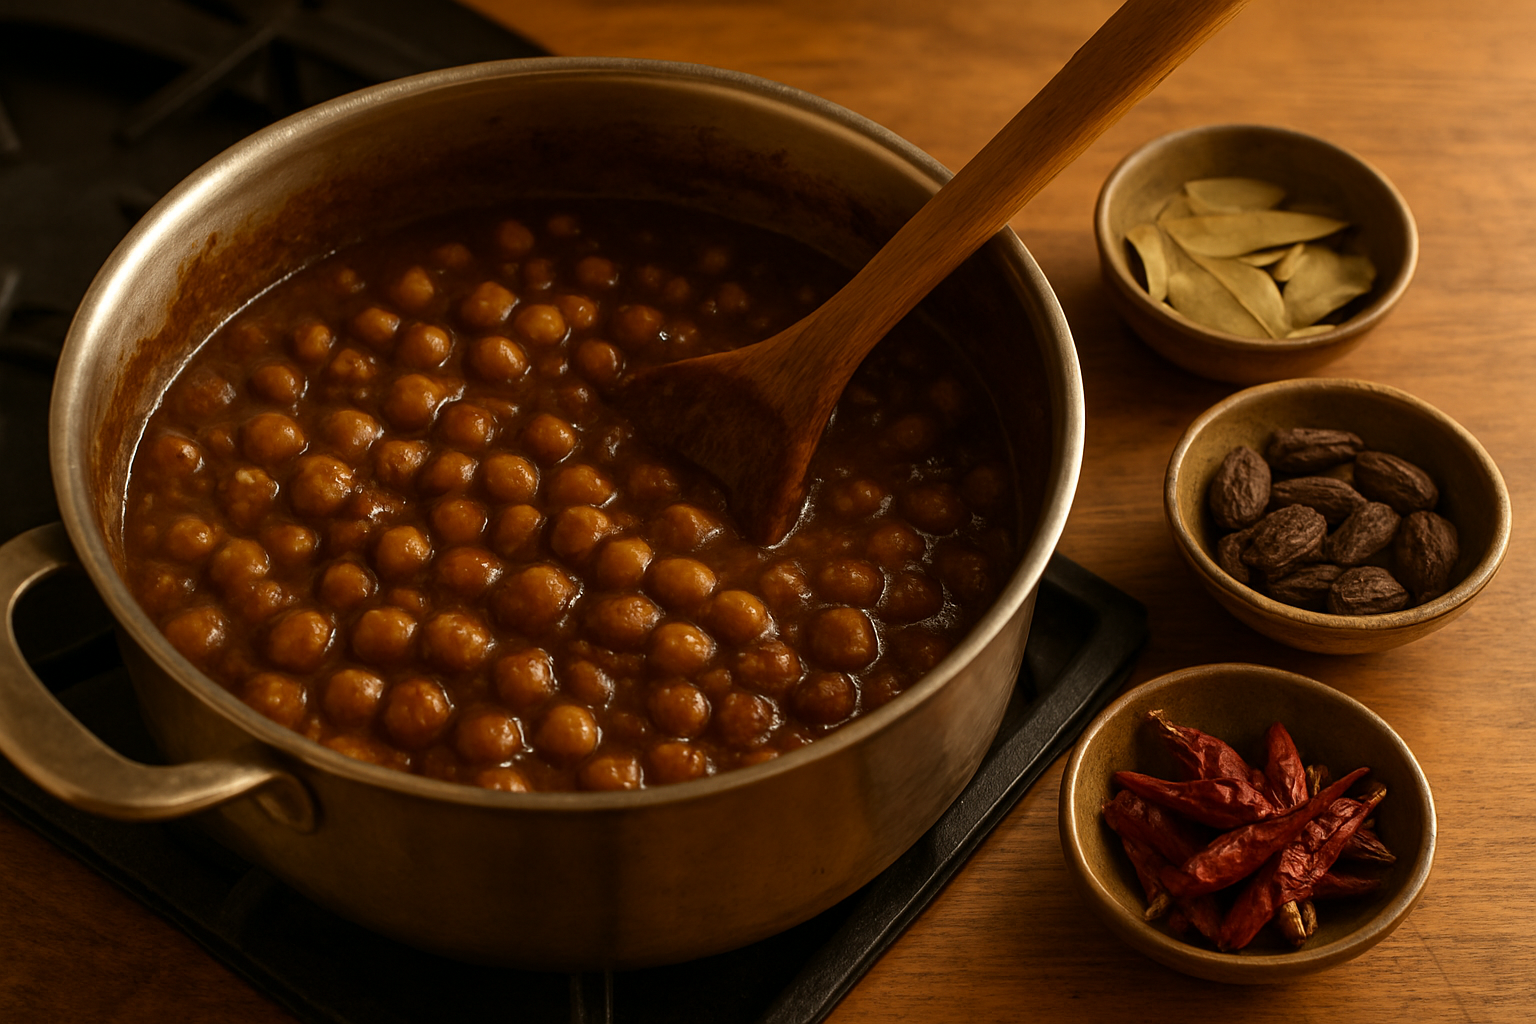
C. Simmering the Chole to Let Every Spice Shine
This is where everything comes together. The simmer is not a formality — it’s where the homemade chole masala seeps into every chickpea and the gravy develops its character.
Combining the elements:
- Add the boiled chickpeas directly into the cooked masala base
- Pour in the reserved chickpea cooking liquid — use this instead of plain water for an immediate flavor boost
- Stir everything together so the masala coats every single chickpea
- Bring to a rolling boil, then reduce heat to low
The simmer process:
- Cover the pan partially (not fully) and let the chole simmer on low heat for at least 20 to 25 minutes
- Stir every 5 minutes or so to prevent anything from sticking to the bottom
- As the chole simmers, the chickpeas absorb the spiced gravy and the whole dish starts to taste like one cohesive thing rather than chickpeas sitting in sauce
- You’ll notice the gravy darkening and thickening — this is exactly what you want
What to look for during simmering:
- The chickpeas should look slightly wrinkled and coated in the masala rather than smooth and shiny
- The gravy should cling to a spoon rather than drip off it
- The oil should rise slightly to the surface — a sign that the masala is fully cooked and the flavors have settled
Taste and adjust:
- Taste the chole at the 15-minute mark and decide if you need more salt, more heat, or more sourness
- If you want more tang, add a little lemon juice or amchur (dry mango powder) at this stage
D. Finishing Touches That Add Depth and Richness
Even a great dish gets better with the right finishing moves. These final additions take your easy chole recipe at home to another level entirely.
The tempering (tadka) finish:
Some cooks skip this step — that’s a mistake. A finishing tadka adds a burst of fresh flavor on top of all that slow-cooked richness.
- Heat a small amount of ghee in a tiny pan
- Add whole cumin seeds and let them splutter
- Toss in a pinch of red chili powder and swirl immediately — it should sizzle dramatically
- Pour this straight over the cooked chole and stir gently to incorporate
The kasuri methi touch:
- Crush a teaspoon of dried fenugreek leaves (kasuri methi) between your palms and sprinkle over the chole in the last 2 minutes of cooking
- This adds a subtle bitterness that balances out the richness of the dish — it’s a small addition with a big payoff
Amchur and lemon juice:
- Amritsari chole needs that characteristic tanginess
- If your chole tastes flat, a half teaspoon of amchur powder stirred in at the end usually solves it
- A squeeze of fresh lemon juice right before serving brightens everything up
Fresh ginger garnish:
- Cut thin matchstick strips of fresh ginger and scatter them over the chole just before serving
- They add a sharp, clean note that cuts through the heaviness of the gravy beautifully
Whole spice hack:
- If you added whole spices like black cardamom and bay leaves during boiling, fish them out before serving — nobody wants to bite into a whole cardamom pod
E. Adjusting Consistency to Get the Gravy Just Right
The ideal consistency for this chickpea curry Indian style is thick but not paste-like, and definitely not watery. Getting this right makes the difference between chole that looks restaurant-worthy and chole that looks like a soup.
Understanding the target consistency:
| Consistency Type | Description | Best Paired With |
|---|---|---|
| Very thick (almost dry) | Clings heavily to chickpeas, minimal liquid | Bhature, puri |
| Medium thick | Pourable but coats a spoon well | Kulcha, rice |
| Thin (soupy) | Flows easily, watery texture | Generally not recommended for Amritsari style |
If your chole is too thin:
- Remove the lid completely and cook on medium-high heat, stirring frequently, to let excess moisture evaporate
- Alternatively, lightly mash about 10 to 15 chickpeas against the side of the pan using a spoon or potato masher — the starch released will naturally thicken the gravy without adding anything extra
- This mashing trick is the go-to method used in most dhabas and home kitchens across Punjab
If your chole is too thick:
- Add small amounts of warm water (not cold water — cold water can dull the flavors) and stir gently
- Let it come back to a simmer before checking the consistency again
- Add a little at a time — it’s much easier to add water than to take it away
The resting rule:
- Once you turn off the heat, the chole will thicken further as it sits — keep this in mind
- If you’re serving in 20 minutes, leave the gravy slightly looser than you want the final result to be
- Chole that’s been sitting for a few hours almost always needs a splash of water and a quick reheat before serving
The spoon test:
- Dip a spoon into the gravy and hold it horizontally
- The gravy should coat the back of the spoon and hold there without immediately sliding off — that’s the sweet spot for a best chole bhature recipe consistency
Serving Suggestions to Complete the Amritsari Experience
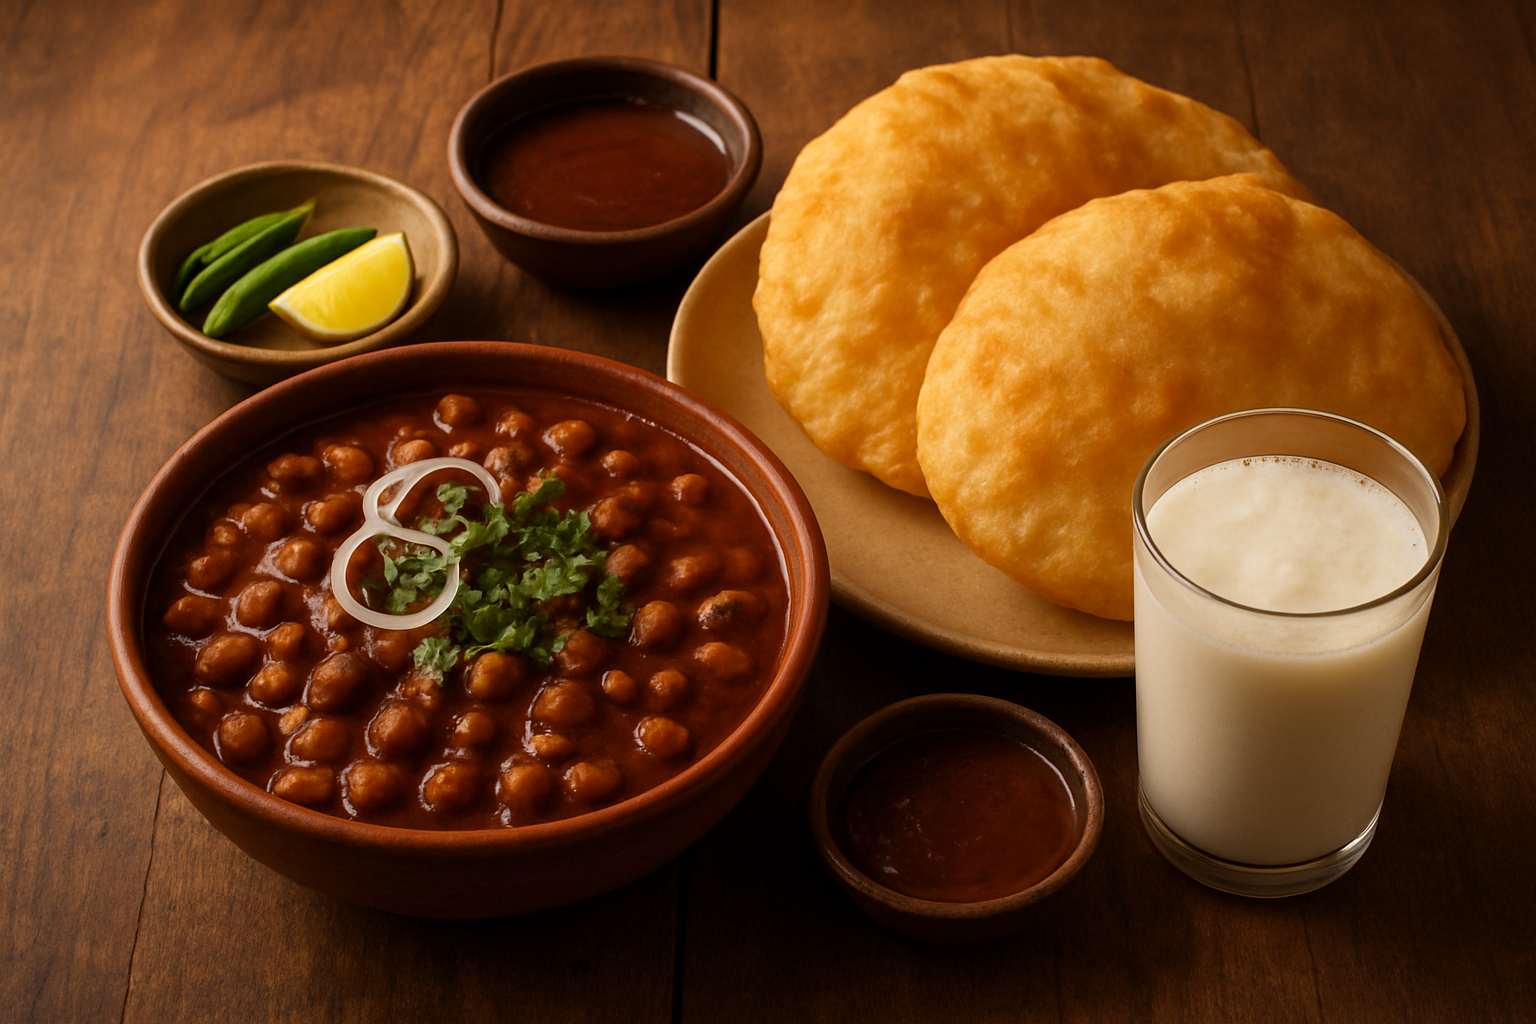
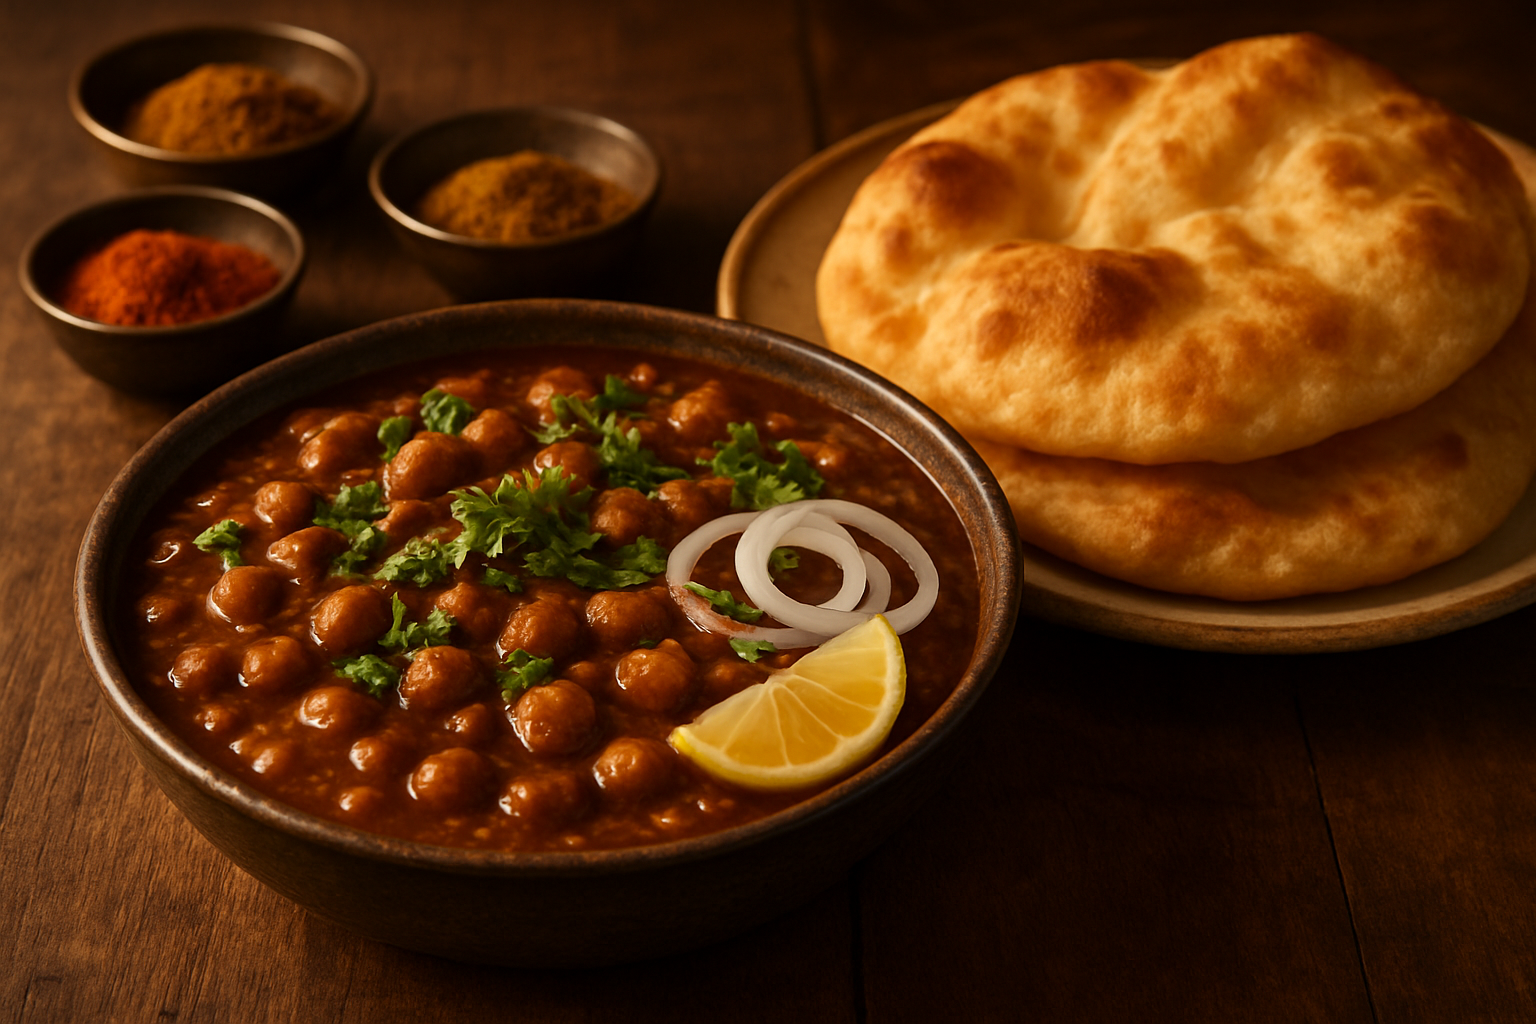
Classic Pairings Like Bhature, Kulche, and Puri
No plate of authentic Amritsari Chole feels complete without the right bread by its side. The thick, tangy gravy is practically begging to be scooped up with something warm and pillowy straight from the kitchen.
Bhature is the most iconic match for this dish, and for good reason. These deep-fried, leavened breads puff up beautifully in hot oil and have a slight chewiness that holds up to the bold, dark gravy of Amritsari Chole. The best chole bhature recipe always treats both components as equals — the chole shouldn’t overpower the bhature and vice versa. To get that authentic Punjabi experience, serve the bhature immediately after frying while they’re still crisp on the outside.
Kulche is the Amritsari version of a stuffed flatbread, and it’s arguably even more beloved in Punjab than bhature. Amritsari kulche is typically baked in a tandoor and comes lightly brushed with butter. The slightly crisp exterior gives way to a soft, flavorful inside, making it the perfect vehicle for soaking up every drop of that spiced chickpea curry.
Puri is the everyday alternative — lighter, smaller, and quicker to make at home. If you’re whipping up a batch of homemade chole masala on a busy weekday morning, puri is your best friend. It pairs beautifully with the chole and keeps the whole experience feeling festive without much extra effort.
| Bread | Texture | Best For |
|---|---|---|
| Bhature | Soft, chewy, deep-fried | Weekend indulgence, special occasions |
| Kulche | Crisp outside, fluffy inside, tandoor-baked | Authentic Amritsari street-food experience |
| Puri | Light, flaky, deep-fried | Quick weekday meals, everyday cooking |
Garnishes That Add Freshness and Visual Appeal
Amritsari Chole is already a deeply flavorful dish, but the right garnishes take it from good to absolutely stunning — both visually and on the palate. They cut through the richness of the gravy and bring brightness to every bite.
- Fresh coriander (cilantro) leaves — A generous handful of chopped coriander sprinkled on top is non-negotiable. It adds a burst of fresh green color and a herby lift that balances the earthy, smoky spices in the chole masala.
- Thinly sliced raw onion rings — These aren’t just a garnish; they’re functional. The sharp bite of raw onion cleanses your palate between bites of the rich curry.
- Green chilies — Slit fresh green chilies on the side or scattered on top add heat and a visual pop of color. They also allow each person at the table to control their own spice level.
- A squeeze of fresh lemon — Right before serving, a squeeze of lemon juice brightens up the entire dish. It heightens the flavor of the spice blend without masking it.
- A drizzle of ghee — For an indulgent finish, add a small spoonful of clarified butter right on top of the hot chole. It melts into the gravy and gives it a glossy, restaurant-quality look while adding a nutty richness.
- Thin ginger julienne — Fine slivers of fresh ginger on top are a classic Punjabi touch. They look elegant and deliver little bursts of zingy freshness that work beautifully against the deep, dark gravy.
Ideal Accompaniments Like Lassi and Pickled Onions
The full Amritsari experience goes beyond just the chole and bread — what you serve alongside makes a real difference to how satisfying the entire meal feels.
Lassi is the drink of choice in Punjab, and it pairs with Amritsari Chole in a way that nothing else can replicate. A tall glass of chilled, slightly sweet lassi cools your palate down after every spicy bite, making it the ideal companion for a bold chickpea curry Indian style. For an even more authentic touch, go for a slightly salted or plain lassi rather than the overly sweetened versions — it keeps the focus on the food.
Pickled onions are the unsung hero of this meal. To make them at home, slice red onions thin, toss them with a pinch of salt, red chili powder, and a good splash of white vinegar, then let them sit for at least 30 minutes. They turn a beautiful pink, and the tangy, slightly spicy flavor cuts through the richness of the chole like nothing else. You’ll find these on every dhaba table across Amritsar.
Raw mango chutney (aam chutney) is a wonderful addition if you want to bring extra tartness to the table. The fruity sharpness contrasts brilliantly with the deep, smoky spice blend of traditional Punjabi chickpea curry.
A side of sliced raw green chilies with salt is another dhaba staple — simple and fiery, it keeps the heat lovers happy without any extra effort.
| Accompaniment | Flavor Profile | Why It Works |
|---|---|---|
| Sweet/plain lassi | Creamy, cooling, mildly sweet | Balances the heat and spice of the chole |
| Pickled onions | Tangy, sharp, slightly spicy | Cuts through the richness of the gravy |
| Raw mango chutney | Tart, fruity, vibrant | Adds a fresh acidic contrast |
| Green chili with salt | Fiery, clean | Intensifies the overall spice experience |
Pro Tips and Common Mistakes to Avoid
Mistakes That Lead to Bland or Watery Chole
Getting your authentic Punjabi chole to taste like the real deal comes down to avoiding a handful of surprisingly common slip-ups. Here’s what goes wrong in most home kitchens:
Not cooking the onions long enough
This is probably the biggest offender. Raw or lightly sautéed onions leave your gravy tasting sharp and underdeveloped. You need to cook them down until they’re deeply golden — almost caramelized — which can take a good 15–20 minutes on medium heat. Don’t rush this step. This is where the base flavor of your homemade chole masala actually builds.
Skipping the tomato cooking stage
A lot of people add tomatoes and move on too quickly. The tomatoes need to cook until the oil separates from the masala. If you see a glossy layer of oil pooling around the edges of your pan, that’s your green light to move to the next step. If you skip past this, the raw tomato flavor dominates and the whole dish tastes flat.
Adding too much water
Chole should have a thick, clingy gravy — not a thin soup. Add water gradually and remember that chickpeas continue to absorb liquid as they cook. If you’ve already gone too watery, simmer uncovered on low heat to reduce the gravy back down. Mashing a small handful of the cooked chickpeas directly into the pot is another great way to naturally thicken things without adding anything extra.
Using pre-ground spices that have been sitting too long
Old spices are flavor killers. If your cumin, coriander, or chole masala has been in your cabinet for over six months, it’s probably not doing you any favors. Fresh, recently ground spices make a night-and-day difference in any chickpea curry Indian style.
Not salting at the right stage
Add salt while cooking the onion-tomato base, not just at the end. Salt draws out moisture and helps everything blend together properly during cooking.
Simple Tricks to Intensify Flavor Without Extra Effort
You don’t need to be a professional chef to get deep, restaurant-level flavor in your Amritsari chole recipe. These tricks are simple and genuinely work:
Use the chickpea soaking water wisely
When you soak your dried chickpeas overnight, toss out that water and cook them in fresh water. However, keep a cup of the cooking liquid — it’s starchy and rich and makes your gravy beautifully thick when stirred back in.
Add a tea bag while boiling chickpeas
This is a classic trick in traditional Punjabi chickpea curry cooking. Drop one or two black tea bags into the pot while you pressure cook the chickpeas. The tannins give chole that characteristic dark color and add a subtle depth that you simply can’t replicate any other way. Remove the bags before you start making the gravy.
Bloom your spices in hot oil
Before adding onions, heat your oil and add whole spices — bay leaves, black cardamom, cloves, and cinnamon — and let them sizzle for 30–45 seconds. This releases their essential oils directly into the cooking fat and the flavor permeates the entire dish right from the start.
Finish with a squeeze of lemon and fresh ginger
Right before you serve, stir in a squeeze of fresh lemon juice and a small pinch of freshly grated ginger. This brightens up everything and gives the chole a punchy, fresh quality that makes it taste like it just came out of a dhaba kitchen in Amritsar.
Use ghee for the final tadka
Even if you’ve cooked the whole dish in oil, a small spoonful of ghee stirred in at the very end adds a richness and aroma that takes the dish to a completely different level. You don’t need a lot — just enough to coat the surface.
Let the chole rest before serving
This is underrated. After you’re done cooking, let your chole sit covered for at least 15–20 minutes before plating. The chickpeas soak up all the spices and the flavors meld together beautifully during this resting time.
How to Store and Reheat Leftovers Without Losing Taste
Good news — Amritsari chole actually gets better the next day. The spices continue to develop overnight and the chickpeas absorb even more flavor as they sit. Here’s how to handle leftovers properly:
Storing Chole
| Storage Method | Container Type | How Long It Lasts |
|---|---|---|
| Refrigerator | Airtight glass or BPA-free container | Up to 4–5 days |
| Freezer | Freezer-safe zip bags or containers | Up to 2–3 months |
- Let the chole cool completely before sealing and storing. Trapping steam inside the container makes the gravy watery and creates conditions for faster spoilage.
- Store in portion-sized containers if you tend to reheat small amounts at a time. This way you’re not repeatedly heating and cooling the entire batch, which degrades both flavor and texture.
- If freezing, slightly undercook the chickpeas before freezing since they’ll soften further during reheating.
Reheating Without Ruining It
On the stovetop (best method):
Pour the chole into a pan and add a splash of water or a small spoonful of fresh tomato puree to loosen the gravy. Heat on low to medium, stirring occasionally, until warmed through. Taste and adjust salt before serving.
In the microwave (when you’re in a hurry):
Cover loosely with a microwave-safe lid to prevent splattering. Heat in 60-second intervals, stirring between each round. Add a tiny bit of water if the gravy has thickened too much in the fridge.
Reviving the flavor after storage:
This little trick makes a real difference — heat a teaspoon of oil or ghee in a small pan, add a pinch of cumin seeds, half a teaspoon of your chole masala, and a tiny pinch of kasuri methi, then pour this over your reheated chole and stir it in. It refreshes the spice profile and makes day-old chole taste almost freshly made.
Scaling the Recipe Up for Parties and Large Gatherings
Making chole for a crowd is one of the best decisions you can make — it’s a crowd-pleaser, it travels well, and it actually tastes better in large batches because of the deeper flavor concentration. Here’s how to do it smartly:
Scaling Guidelines
| Batch Size | Dried Chickpeas | Onions | Tomatoes | Chole Masala |
|---|---|---|---|---|
| Standard (4 servings) | 1 cup (200g) | 2 medium | 2 medium | 2 tsp |
| Medium party (10–12 servings) | 2.5 cups (500g) | 5 medium | 5 medium | 4–5 tsp |
| Large gathering (20+ servings) | 5 cups (1 kg) | 8–10 medium | 8–10 medium | 3–4 tbsp |
A few things to keep in mind when scaling up:
- Spices don’t always scale linearly. When doubling or tripling a recipe, start with about 75% of the scaled spice quantity and taste as you go. Spices in large volumes can become overwhelming, especially ones like cloves, black cardamom, and raw mango powder (amchur).
- Use a wide, heavy-bottomed pot or a large kadhai. A bigger surface area means better evaporation and more even cooking. Thin or small pots at high volumes will steam the ingredients rather than sauté them, which kills the flavor.
- Cook the base in stages if necessary. If you’re making chole for 30+ people, it’s better to sauté the onions and tomatoes in two separate batches and then combine everything together. Overcrowding the pan leads to steaming instead of browning, and you lose that rich, deep masala flavor that makes an easy chole recipe at home feel like restaurant quality.
- Pressure cooker or Instant Pot is your best friend. For large batches of chickpeas, a pressure cooker significantly cuts down the cooking time and ensures even cooking throughout. For the best chole bhature recipe results at a party scale, pre-cook the chickpeas in batches the night before and refrigerate them. Then make the gravy fresh on the day of the event and combine everything.
- Make it a day ahead. For large gatherings, cooking chole a day in advance is actually ideal. Store it covered in the fridge, and reheat gently before serving. The flavors deepen overnight and you free yourself up for other prep work on the day of the event.
- Keep a small bowl of raw onion slices, green chillies, and lemon wedges ready on the side. These condiments let guests adjust the heat and freshness to their preference, which is especially helpful when serving a mixed crowd.
Making Amritsari Chole at home is completely doable once you understand what goes into that deep, bold flavor. From picking the right chickpeas and spices to nailing the cooking process and avoiding the common pitfalls, every step plays a role in getting that authentic taste on your plate. The spice blend is where the magic happens, and pairing the dish with the right sides takes the whole experience to another level.
Now it’s your turn to bring this Punjabi classic to your own kitchen. Take your time with the spices, don’t rush the cooking process, and trust the steps. Once you get it right, this is the kind of dish you’ll want to make again and again — and probably the one your family will keep requesting every weekend.